Showing posts with label animals. Show all posts

Monday, February 17, 2025

When Beadie Critter Patterns Don't Work

I've spent a couple of weeks doing a bunch of Valentine patterns that I own from the now-defunct Danette's Beady Buddies. I posted the photos of the ones I made on my Margo's Beadie Critters FaceBook page. They are really cute.

In the process of doing these patterns, I discovered that some of them didn't really work as well as they looked like they would in the drawing of the pattern. A certain amount of this might be due to the materials I use - wee pony beads and plastic lacing - but a lot of it is, I believe, because they drawn without ever being tested. 

If you've got enough experience at making Beadie Critters, you can find ways to modify the patterns so that they work better. Let me show you some examples.

Problem 1: Ear Issues


You can see that "Li'l Foxy" has a little issue with the first row of beads on his head being raised up from the second row. This is because the ears are ending with a two-bead row before proceeding to row 2 of the head. The pattern shows the ears resting just fine against the first two rows of the head for all three of the patterns for the critters shown above, but that won't ever actually happen. 


I came up with a couple of solutions to this problem that worked.

In the picture below, I started with 2 beads for the first row of the raccoon's head instead of 4. Then, I strung on 4 beads for the ears. Completion of the ears this way meant that the ears stuck up just a little more than in the drawn pattern, but it avoided that humped look that we got with the completed fox above.


For the tiger, I did the same technique (reduced row 1 of the head by 2 beads), but used only 3 beads for the ears. This is still pretty humped. This was an early attempt to fix the problem, and the racoon was completed later with slightly better results.


The picture below shows another way to do the ears. I added one extra bead, and then went through that extra bead sideways like you would for an arm or other appendage, pulling tight before going on to row 2 of the head.


So, if you have a pattern that shows the ears like the pattern drawings below, you now have a couple of possibilities for making this pattern work.

Can you see the change I made to this elephant beadie to make the ears work?


And on this bunny?

Problem 2: Arm Issues

A lot of the patterns I was using to make Valentine critters had arms that were two beads wide seamlessly working with the rest of the body. Again, this is never going to work.


So for these types of arms, I had two methods I used. One was similar to the second method I used on the ears, adding a bead and going through that single bead before continuing with the body row. See that on the Mickey Mouse and Tiger below.


The other method was to simply make the arms only 1 bead wide instead of 2. I used that method for the Minnie Mouse and Mouse below.

You could choose either one of these methods to make the arms work on a pattern that is written with arms that are two beads per row.

With these two modification methods in your toolbox, there are a whole variety of patterns that you previously would have given up on or not tried because they didn't work as drawn. Now you can do them!

Sunday, May 17, 2015

On the Wings of an Eagle

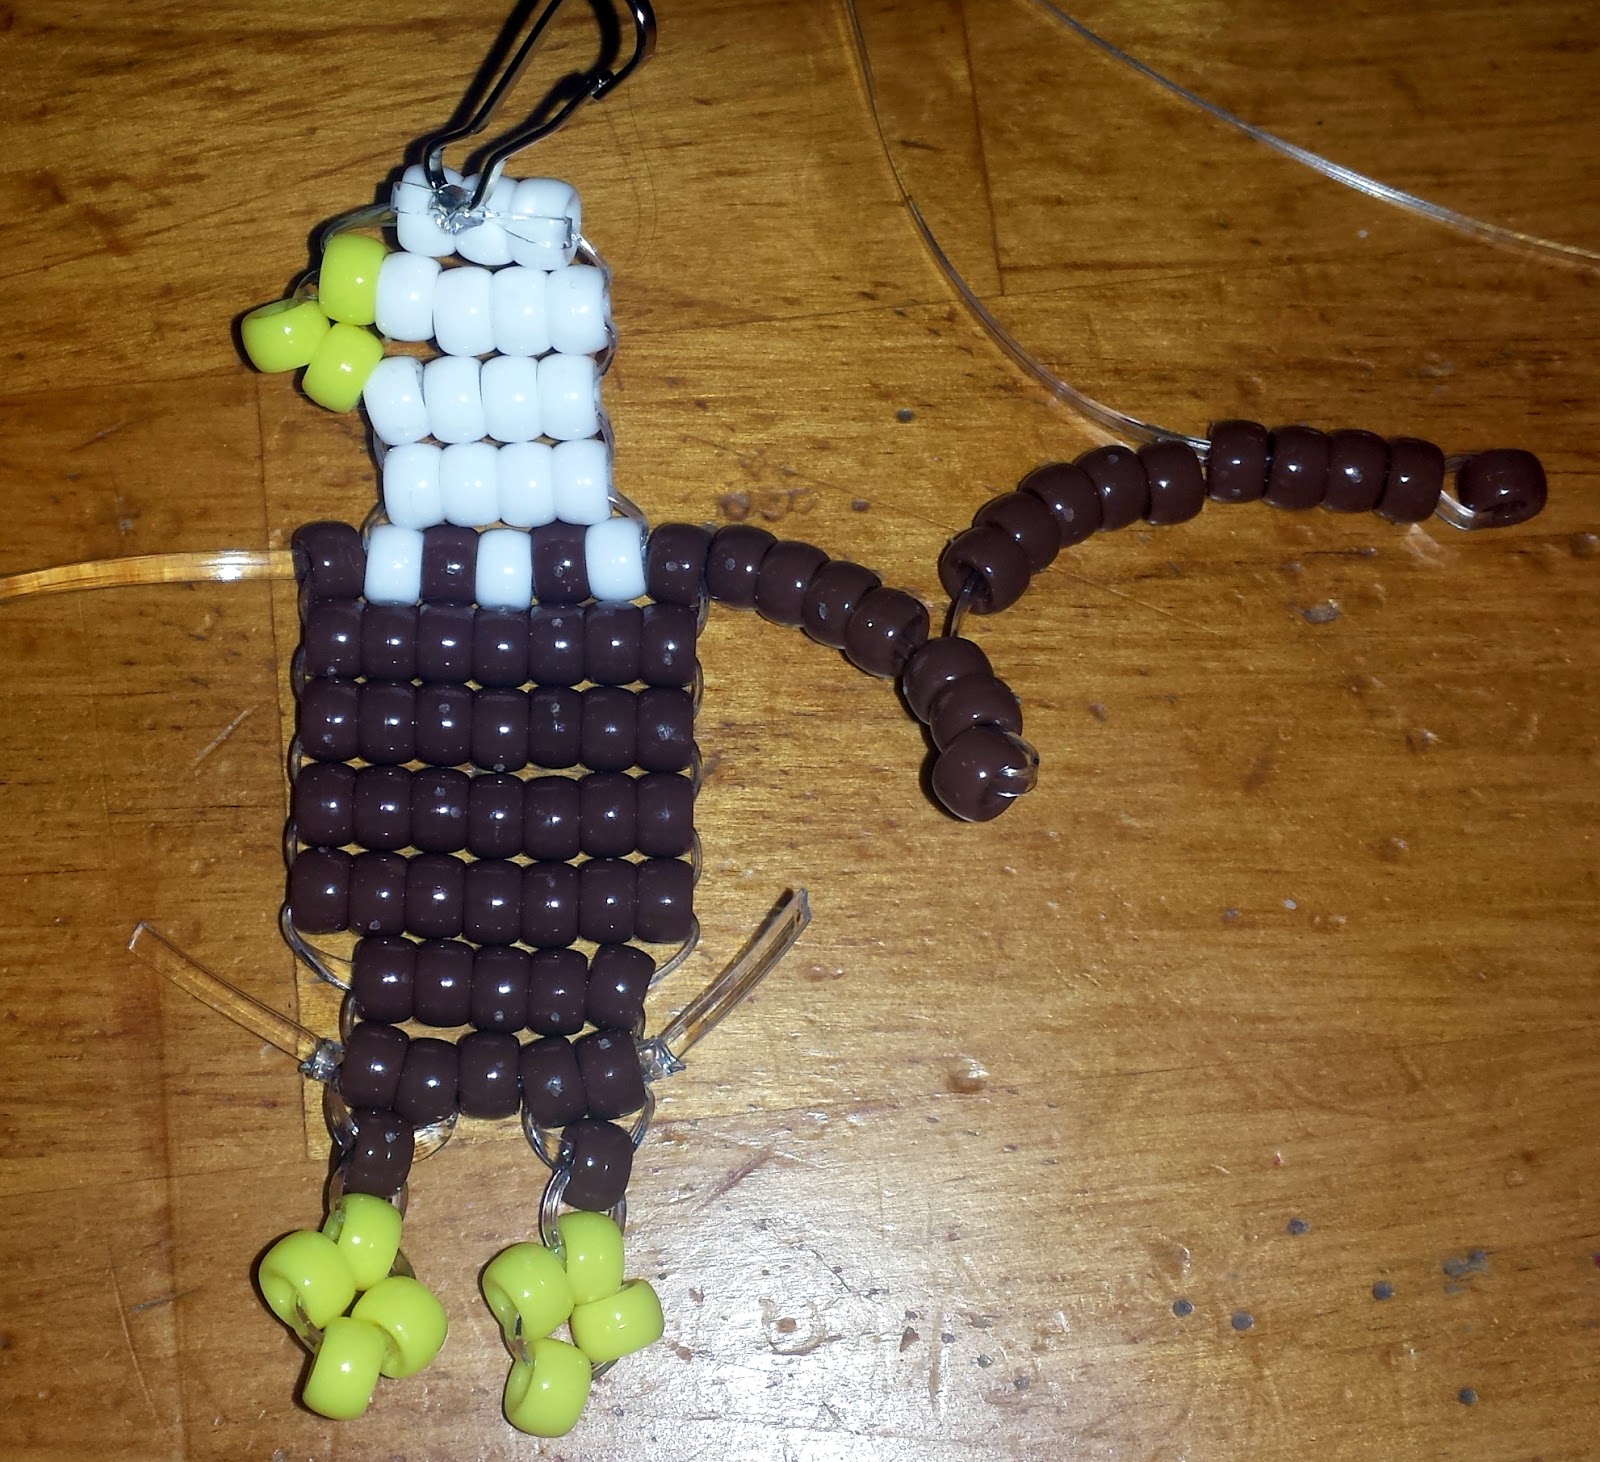
I had a email request for help with the wings on the Eagle pattern. I had a look at them and thought I understood, but thought I'd make sure I was right. I was glad I did because it turned out to be more complicated than I was thinking it was. This is one of the most advanced patterns on the site.

The completed Eagle beadie.
I took pictures throughout the process of doing one of the wings and sent them to the person who emailed me. I decided to put them here on my blog as well, so that it can help others.

The first part is the easy part. Do the entire body of the eagle (head down to the feet) with no wings. Finish off the body. Then, take the 2nd string that the instructions call for and slide it through row 5 (the one that is brown-white-brown-white etc.) so that it is even on both sides.


All of these next instructions will be with brown beads. We will work with only one side of the string, so it will make one wing.

Add 7 beads. Go back through 2 beads. Then add 10 beads. Go back through 4 beads.


Now add 8 beads and go back through 5.


Now you will start the final shaping of the wing. Go back up through the 2nd bead that is currently loose.


Then take the string down through the next two loose beads.


Add 4 more beads and go back up through three of them.


Then back up through the next three loose beads.


Then down through the final 4 loose beads.


Finally take the remaining string through row 8 of the body of the eagle.


Repeat this process to do the wing on the other side. Finish off both of these strings.

In the picture below I've numbered the strings in the order you will put them on. The blue string indicates the part where you are adding beads and going away from the body of the eagle. Then the red string is where you're heading back toward the body. I hope this explanation is helpful for those who may wish to try making an Eagle.


Wednesday, May 4, 2011

Sunshiney Day!

The sun is shining so beautifully today!

Here's a sun beadie critter:

Sun 2: www.beadiecritters.com/beadsun2.htm

How about a bird to celebrate the birds singing so sweetly?

Trio of Birds: www.beadiecritters.com/beadbirds.htm

And a ladybug that you might find while gardening:

Ladybugs: www.beadiecritters.com/beadladybugs.htm

Finally, a snake that you would hope not to find in your garden!

Snake: www.beadiecritters.com/beadsna.htm

Enjoy the sunshine, if it's shining where you are! Take your beads outside to your deck or porch and soak up some rays while you bead!